No Sew Curtains

So I had this post set up as a draft back in February 2013, but I never got around to actually ever doing the curtains. Since then we have moved, and we have been living with super long curtains in the bathroom! Now, I don’t sew, I want to get into it but it just isn’t on the top of my priority list right now, so this is the quick lazy man’s way of hemming or “sewing” without a machine 🙂

Here are our super long curtains:

I had Steam – A – Seam that I picked up forever ago (probably when I saved this as a draft back in 2013), so I used that. You can find this in craft stores or maybe even Walmart. It comes in a package with full sheets of stickiness lol. So you would just cut strips for the length and width that you would need it for.


Place the curtain somewhere or on something you can iron on. It looks like it’s just on carpet but I have a magnetic ironing pad that sits on my washer so I just used that underneath.

Once the curtain is set, you want to figure out where you are hemming. For me this was easy, I wanted the last full grey strip to be my length, so I folded the curtain and placed the strips of the Steam – A -Seam on the bottom. You peel the paper off on one side and stick it to your fabric then once stuck, peel off the paper on the other side. Next you can stick the fabric together (your planned hemmed length should be on the bottom when you place the fabric together) then all you do is iron (I went back and forth slowly maybe 3-4 times and that seemed to be enough).

Voila. Hemmed curtains that took me probably all of 10 mins 🙂


Got to love easy!


Cheap Photo Collage

This is a craft I found on Pinterest, the only difference is they used a heavy duty poster board, like the thick foam boards and they cut all thier pictures the same size.

Here are the supplies:

A piece of poster board (you can have it any size, depending on how big you want your collage)

Modge Podge

Foam paint brush

Pictures (as many as you want to make the collage you want)

Paper cutter

Tape runner

Other decorating supplies (stickers, ribbon, letters, paper, etc)

Supplies

Supplies

Instructions:

Cut the poster board to the size you want and cut all the pictures to the size you want (I cut out all the extra space in the pictures)

Tape the pictures to the poster board in any arrangement you would like.

Decorate the poster board, pictures however you would like (you want to do this before you modge podge to help keep the decorations)

Using the foam brush, paint the modge podge over the entire poster board (picture and decorations in all).

Do about 3 coats and let completely dry after each coat, then go ahead and frame it or just hang it up (by taping)

Pictures aligned

Pictures aligned

Due to confidentiality, I can’t show the whole project complete. Basically you would tape these pictures on to the black poster board and then use the modge podge and do about 3 coats to make the collage glossy and pretty. You can have your pictures any different sizes and you can decorate your poster board however you would like, make it pretty and personalized.

For mine, I used my Cricut and cut out letters, spelling Friends and Family in green glittery paper and put it underneath the first row of pictures. It looks so nice and I can’t wait to hang it in my office 🙂

No Sew Pillows

I came upon a post on a random blog (I can’t even remember where now, it was a long time ago) about making curtains without sewing. Since I don’t own a sewing machine this REALLY appealed to me! I need new curtains so bad! Eventually I will get to making those curtains, but for the time being I decided to try making pillows. It came out so well and I am so excited to show you this very easy technique!

The things you will need are: (makes 2 pillows)

1 yard fabric

1 package or roll of Steam a Seam (can be found at most craft stores)

2 12oz packages of Polyfill

Iron

scissors

Here are the directions:

1. Cut the fabric in half (whichever way is fine)

The fabric cut in half

The fabric cut in half

2. Once you have the two halves cut them in half again, you should have 4 pieces (quarters)

Fabric cut in four

Fabric cut in four

3. If you use the sheets of Steam a Seam, cut them in to strips about 1 inch thick and out line one of the quarters with it, peeling one side and sticking it to the fabric (face up). Leave a small spot where you will be able to turn the pillow fabric out to the correct side.

Steam a Seam

Steam a Seam

Fabric outlined with Steam a Seam, but left the right corner open to be sealed later after the fabric is turned out and stuffed

Fabric outlined with Steam a Seam, but left the right corner open to be sealed later after the fabric is turned out and stuffed

4. After the Steam a Seam is securely placed on one of the quarters, peel off the other side and line up a second quarter (pattern side down) and smooth out, making sure that both fabric quarters are secure.

Two quarters attached

Two quarters attached

5. Now you are going to take the iron (follow the directions on the Steam a Seam you purchase) and on the cotton setting iron around the edges, “sewing” the edges together securely. Just tug a little to make sure that the seams attached.

6. After the two quarters are ironed and attached you need to find the spot you left open and turn the fabric inside out so that the patterned side is now outside.

Turning the fabric inside out

Turning the fabric inside out

7. Once the fabric is all turned out, take one bag of Polyfill and taking small chunks at a time, stuff the pillow, the full bag of 12 oz should fit in the pillow

Stuffing the pillow

Stuffing the pillow

8. Once the pillow is all stuffed you need to seal the hole where you were stuffing, cut a small piece of Seam a Steam (make sure it is big enough to cover the entire length of the hole) and attached to the fabric. Then using the iron iron over the spot sealing the hole (this will be a little difficult since the pillow is stuffed but it is doable).

Pillow 1

Pillow 1

Pillow 2

Pillow 2

I love the way these look and I highly encourage you to give this no sew pillow a shot!

Cheap Homemade Bookmark

So when I say cheap I mean that I paid NOTHING for this craft. It was FREE!! You can use whatever you have on hand and make it unique and your own 🙂

All you need are (free) paint strips from Home Depot, Walmart, wherever you can find them.

Cool hole punches

Some ink and stamps to decorate with (I used paint because I didn’t have ink)

Some pretty string or ribbon

Supplies

Supplies

I just punched a hole on the top of the paint strip and tied ribbon to it. Then I took the stamp and stamped it on the paint strip. There you go…done! Now you have cute and cheap bookmarks 🙂

**You could also cut the paint strip to whatever size you are comfortable using

DSC03130

I know a lot of people just use random things they find as bookmarks but if you can have cute ones that are Free, then why not 🙂DSC03134

Now go ahead and make your cute bookmark!

Cherry Blossom Scarf

Since it is yet another blizzard here in good ole CT, I figured I would share something warm with you all 🙂

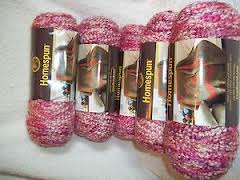
For my younger sister’s Birthday I made her a scarf. My favorite brand for anything that I have made is Homespun’s Lion Brand! It is super soft and I love it, it is a thicker yarn so it takes some getting used to but once you get the hang of it it is amazing!

I used this yarn:

Homespun Lion Brand Cherry Blossom

Homespun Lion Brand Cherry Blossom

These are pictures of the scarf I made, it was just a double crochet, about 20 rows across. These pictures don’t really do the scarf or the colors justice but here they are:

DSC03016

DSC03018

DSC03021

My MIL taught me how to crochet many years ago, and I have only made a couple scarfs and a couple blankets so far. I really enjoy crocheting but haven’t gotten into anything fancy yet. I’m waiting for my SIL to teach me some fun new ones! I taught her how to crochet and she took off with it! She is pretty amazing and I am so jealous of what she can do! 🙂

Stay safe and warm my fellow CTers!

Quick & Cute Cookie Gift Carrier

I normally just throw the cookies into a ziploc bag and hand them out that way…well not anymore! Here is a very easy, quick and very cute cookie carrier:

All you need is:

Everything you need

Everything you need

12×12 piece of scrapbook paper

tape runner (or double sided tape or regular tape, and roll it)

cleaned out Pringles can (can use any size but I used the full size one)

ribbon

Directions:

1. Cut the scrapbook paper to 10×10 1/2 (might be a little long but that is ok)

2. Using the tape runner, tape four pieces down one side of the paper (one of the 10 1/2 sizes and design side) and tape 1 piece on 2 sides of the Pringles tube

taped

taped

3. Roll the paper around the tube and rub to make sure the paper sticks to the tape on the paper and on the tube.

4. Then fill it with cookies and tie it with a pretty bow to handout 🙂

Pretty Cookie Gift

Pretty Cookie Gift

Perfect Carrier

Perfect Carrier

**The large Pringles tube can hold anywhere from 12-20 cookies, all depending on how big your cookies are.

How Cute & Simple is that!!! No more Ziploc bags for me 🙂

Framed Monogram

For Christmas a couple years ago I made this framed monogram for my SIL, with the color scheme of her wedding.

Framed Monogram

Framed Monogram

This isn’t the greatest picture, but I was really happy with the results! I bought a 16×20 black frame (keep the cardboard that is behind the glass, you will use this), wooden letters & numbers,  and purple paint from ACMoore, and damask (black & white) and purple fabric from Joanne’s.

First I cut the damask fabric, the length & width of the frame and I painted the letters purple (only the top and sides, the bottom will be glued down), I did probably about 2-3 coats of paint.

Next, I took the cardboard from the frame (found behind the glass) and using Aleene’s tacky glue (might not be the best thing to use, but it worked well for me :-)), I glued the fabric to the cardboard (I just drizzled lines all over then after attaching the fabric, I smoothed it out). Let this completely dry!

After the fabric is dry and the letters are dry, you can go ahead and arrange the letters and numbers how you want them, then glue them down using the tacky glue.

And you are done! Just let it completely dry before you pick it up, we don’t want any mishaps!

**I also made a fabric flower to put on as an accent, you can find the pattern here. The pattern calls for ribbon, but I used fabric and, it was pretty easy! I also added two black & white buttons just for a little more of a pop!

Enjoy!

Minnie Themed Birthday Banner

A while back, my beautiful Niece turned ONE! My sister had a Minnie themed 1st Birthday Party,  and even though  I was unfortunately unable to attend I was able to contribute a pretty little banner! Here is the Minnie inspired banner that I made for her!

Happy 1st Birthday Chloe Banner

Happy 1st Birthday Chloe Banner

I just cut out all the letters and numbers out on red & white polka dotted paper using my Cricut, and cut out black circles as the letter background. I cut out smaller black circles to make Minnie’s head & ears, then cut out little bows using the red & white polka dot paper.

I’m not a perfect Banner maker but I am getting there, the multi tiered ones are a little tricky!

Any 1st Birthday is a blast even though it is more for the parent than the kid & I am bummed I missed it! Love you Chloe!

Reading Crafts

I love to read & love to craft, so for a benefit last Christmas I created a book/reading themed raffle basket and here are two crafts I made to go in it:

A "I Love Big Books & I Can Not Lie" tote

A “I Love Big Books & I Can Not Lie” tote

I got the medium sized tote from AC Moore and just painted the letters with a stencil that was cut out by my Cricut (I cut each word separate so that I had a word by word stencil).

A small Canvas that says READ

A small Canvas that says READ

For the canvas I got a small sized canvas from AC Moore. I used my Cricut and cut out letters I needed out of Vinyl. Then I painted stripes vertically on the canvas (roughly the width of the letters) using 4 different shades of teal. I let that completely dry then placed the vinyl letters on the canvas (these didn’t stick too well so just make sure you rub and get it to stay as best you can). Then I took the black paint and painted over the letters (make sure it is a good coat because you only get one shot and make sure your letters stay down so you don’t paint under the letter). Lastly, carefully remove the vinyl to reveal your word (do this as quickly as you can after you are done painting because you don’t want it to dry on the canvas).

Other items that I put in the basket were: $25 gift card to Amazon.com, a framed paper that said: “I Am Simply A Book Drunkard”, some books (Night Road by Kristin Hannah, The Host by Stephanie Meyer and Extremely Loud & Incredibly Close), two bookmarks (one said Shhhh I’m Reading and the other was shaped like a worm) and a book light.

Don’t you wish you won this basket?!?! 🙂